
Hundreds Of Free Knitting Patterns And So Much More |
Barbara Breiter's Knitting On The Net |
|
Learn To Knit
|
Baby Coat Knitting PatternDesigned by Mary Lee Herrick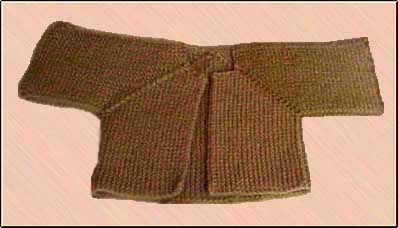 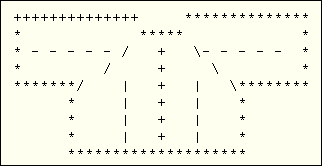 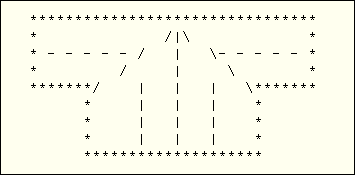 On the same needle, with the same yarn (maybe the other end of the skein), cast on another 35 stitches. Work these two bits separately for 5 ridges (10 rows). Then: Knit across first piece, place marker, make a stitch, knit across second piece--pieces are now joined. Knit back. Now you are going to do a double decrease at the marked stitch on every other row until half the stitches are used. What I do is: Knit to one stitch before marker, move the marker back one stitch by slipping the next stitch, take marker off, put stitch back on left-hand needle, put marker on right needle, do S2KP (slip 2, knit one, pass slipped stitches over), knit to end. Knit back. Repeat these two rows until there are 20 stitches before the marker (41 stitches total). Knit 4 rows even (underarm section). Now start to increase. Knit to before marker, make 1, slip marker, knit 1, make 1, knit to end. Knit back. Repeat this until there are 40 stitches in front of the marker (81 stitches in total). This is the middle of the back. Next row: knit to marker, slide marker, k1, bind off the rest of the stitches. Next row: Cast on 40 stitches, knit to the end of the row. Alternatively, one could: 1. bind off the first 40 stitches (to the marker), knit to the end of the row. 2. Knit 41, PM, cast on 40 stitches. Now do the double decreases like on the front until there are 20 stitches before the marker, knit 4 plain rows (second underarm), do the double increases until there are 35 stitches before the marker. Knit 35, cast off 1, knit to end. You will now work both 35-stitch sections separately for 5 rows, cast both off. Sew tops of sleeves together. Put I-Cord or crochet around edges, making a loop at the top of one side of collar for a buttonhole, put button on other side of collar. Alternately, sew buttons to one side of front, put I-cord or crochet down other side of front, not attaching it where the buttons are, to make the buttonholes. Afterword: The trick is to balance the increases and decreases. Another solution to this would be similar to raglan options: Instead of one stitch in the center, leave 3 stitches, or even make a cable, then do the increases and single decreases on either side of this center section (k2tog and SKP). I did make an adult version of this. It has one advantage over most of the one-piece garter designs out there: It is vertically patterned all the way down, instead of the horizontal design around the hips most of them have. However, by the time you are near the end, you have a lot of garment in your lap! I messed up on the neck of the adult piece; it came out way too wide and I had to add sections up there. Just a warning that it makes a heavy adult coat, so think of the gravity factor and make the neck smaller than you think it should be. Or be ready to compensate, which isn't difficult to do. Adults are not as square as babies. I made the sleeves too short, and then just picked up and knitted down until they were long enough. It actually looked pretty good. What I mean in general is that the proportions will need to be played with on an adult coat, but that just making one and compensating afterwards is fun, easy, and your solutions make the coat uniquely yours. This pattern may be freely shared or used not for profit, or put on the gift web site. See Abbreviations and the Glossary for help. |