
Hundreds Of Free Knitting Patterns And So Much More |
Barbara Breiter's Knitting On The Net |
|
Learn To Knit
|
Fingerless Gloves Knitting PatternDesigned by Alyssa Heath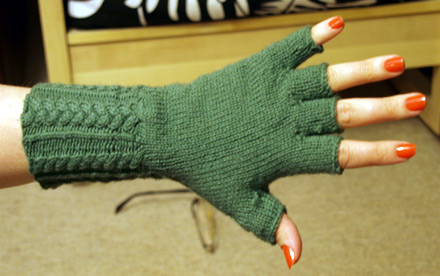 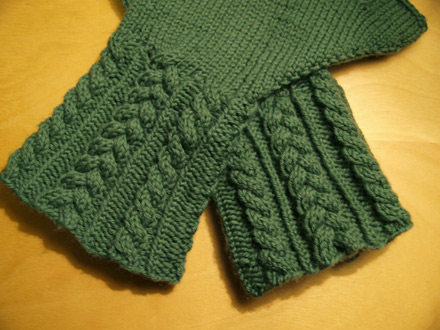 I made this to fit my hand snugly. My wrist is about 6.5 inches around at the thinnest point, about 7 inches at the bottom of the cuff. My hand (excluding thumb) is around 8 inches around and my thumb is about 2.5 inches around. Suggestions for amending the size are given on the pattern page. Gauge 7 stitches and 10 rows = 1 inch in stockinette. Each pattern repeat measures just under 2 inches across and just under half an inch (7/16ths of an inch) high (more like 1cm). Notions You will need a set of 3mm dpns (sharp ones will be helpful for the decreases and increases), a cable needle and at least two stitch holders/spare needles, plus some scraps of yarn for holding the thumb stitches and two stitch markers. Yarn Rowan Pure Wool 4ply, colourway Glade, approx 180m. Stitches/abbreviations k1tbl: Knit one through the back loop L2C: Slip two stitches onto a cable needle, hold in front, k2, then knit the two stitches from the cable needle L3C: Slip three stitches onto a cable needle, hold in front, k3, then knit the three stitches from the cable needle R3C: Slip three stitches onto a cable needle, hold behind, k3, then knit the three stitches from the cable needle CDD: Centred Double Decrease. Work as follows: Slip two stitches as if to k2tog, k1, slip the two stitches back over the knit stitch m1: Make one. Feel free to substitute your preferred increase Purl on: (a simple method of casting on when you already have stitches in use) Section 1: The Cuff Using a flexible cast on such as a long tail cast on, cast on 69 stitches and split across three needles [23, 23, 23]. Join, being careful not to twist. Rounds 1, 2 and 3: *k4, p2, k1tbl, p2, k9, p2, k1tbl, p2*, repeat twice more to complete the round. Round 4: *L2C, p2, k1tbl, p2, L3C, k3, p2, k1tbl, p2*, repeat twice more. Round 5: Repeat round 1. Round 6: *k4, p2, k1tbl, p2, k3, R3C, p2, k1tbl, p2* repeat twice more. Round 7: Repeat round 1. Repeat rounds 4 - 7 a further six times (seven repeats in total). Note - if you wish to shorten the cuff, simply do fewer repeats. Each repeat is approx 1cm or 7/16th inch long. There are a further two pattern repeats with decreases (see below). Section 2: Reducing the cuff for the wrist Round 1: *L2C, p1, CDD, p1, L3C, k3, p1, CDD, p1* Repeat twice more to complete round. [19, 19, 19] Round 2: *k4, p1, k1tbl, p1, k9, p1, k1tbl, p1*, repeat twice more. Round 3: *k4, p1, k1tbl, p1, k3, R3C, p1, k1tbl, p1. * repeat twice more. Round 4: Repeat round 2. Round 5: *L2C, p1, k1tbl, p1, L3C, k3, p1, k1tbl, p1. * Repeat twice more to complete round. Round 6: Repeat round 2. Round 7: *k4, CDD, k3, R3C, CDD*, repeat twice more [15,15,15] If you are worried about this being too tight, the simplest thing to do is omit the crossover and replace k3, R3C with k9. Or just omit the decreases and add in a couple of plain rows to make up the length difference). Hang up your cable needle and knit a further 5 rounds of plain knitting. (Note: this is optional, I just like to have a bit of stockinette stitch over the wrist but some people may not share this odd affliction, so feel free to reduce the number of rounds here or work none at all and go straight into the increases. Section 3: Body of the mitten A note on increases I made these mitts to fit my hands snugly. The best way to check how yours are fitting is to knit until the marker (see below), then with four needles with live stitches on, slip them over your hand. The marker will be in line with your thumb. Using this, you can check progress and fit throughout this section to make sure they really do fit 'like a glove'. If you amend the stitch totals make sure you account for this when making the fingers as the stitch totals per finger are based on 71 stitches. Right mitt Round 1: k4, m1, place marker, k1, m1, knit to finish round. [47 stitches, split 17, 15, 15] Round 2: knit plain Round 3: Knit to marker, m1, slip marker, k1, m1, knit to finish round. Round 4: knit plain Keep repeating rounds 3 and 4 until you have 71 stitches total. Omit round 4 the last time, so you finish with the round in which you increase up to 71 stitches [41, 15, 15] Left mitt You may find it helpful to rearrange stitches to [20, 10, 15] before doing this as the increases happen on the last stitch on the first needle if you don't. Round 1: k14, m1, place marker, m1, knit to finish round [47 stitches split 22, 10, 15]. Round 2: knit plain Round 3: Knit to marker, m1, slip marker, k1, m1, knit until you finish the round. Round 4: knit plain Keep repeating rounds 3 and 4 until you have 71 stitches total. Omit round 4 the last time, so you finish with the round in which you increase up to 71 stitches [46, 10, 15] Both mitts: Separating out the thumb Count eight stitches to the right of the marker, and knit until you reach this point. Slip the next 17 stitches onto a spare bit of yarn. These 17 stitches should be centered around the stitch directly to the left of the marker, so there should be eight on the right hand side of the marker and nine on the left. Then, with these stitches secured and out of your way, finish the round, closing the gap across the base of the thumb. It might help to place a marker here for future reference. You should have 54 stitches still 'live' on your needles and 17 stitches on a spare bit of yarn to make the thumb. Knit a further 10 rounds plain. As always, you can try these on to check the fit and length. Handwarmer option You can continue and knit around a further ten rounds (or more or less depending on your own preference) and then cast off loosely to make hand-warmers. Otherwise, it's on to the fingers! Section 4: Fingers Knit from the start of the round until you are at the point at which you separated out the thumb stitches. Slip the next 27 stitches onto one stitch holder or spare needle (you will need at least four needles for knitting each thumb, so bear this in mind!) and then the remaining 27 stitches onto another stitch holder or spare needle. This should allow you to flatten the mitt with the thumb increases all up one side. From now on, these two needles/stitch holders (I'm calling them needles) will be referred to by their position relative to your hand. The first is the palm needle - so whichever mitt you're working on, the needle which will be on the inside of your hand when wearing the mitt is the palm needle. The other is the back-of-the-hand needle. When joining in new yarn for each finger, leave a long-ish tail so you can use it to sew up any unexpected gaps. Index finger Take 8 stitches from the palm needle and 8 from the back-of-the-hand needle and place them on two dpns. Starting from the corner of the hand next to the thumb (conveniently, where your yarn is right now), knit 8, then purl on three stitches onto a third dpn, then knit 8 [19 stitches total]. It might also be useful to rearrange the stitches slightly at this point, but make sure you mark the beginning of your round. Knit a further ten rounds plain, then cast off very loosely. Middle finger Take the next 7 stitches from the back-of-the-hand needle and put them onto one dpn, then take the next 6 from the palm needle and put them onto another. Introduce your new yarn at the corner of the index finger, knit along one needle away from the index finger, then cast on three stitches, knit along the other needle and pick up three stitches across the cast-on stitches from corner of the index finger [19 stitches] Rearrange stitches across three dpns if desired, making sure to keep track of where your round starts. Knit a further ten rounds plain, then cast off very loosely. Ring finger Work the ring finger exactly as the middle finger, except replace the word "index" with "middle". Pinky You should have five stitches left on the back-of-the-hand needle and seven on the palm needle. Starting from the corner of the ring finger, knit 12, then using a third dpn pick up three stitches from the cast on stitches at the base of the ring finger [15 stitches]. Rearrange the stitches across three needles making sure you mark the start of your round. Knit a further ten rounds, then cast off loosely. (You might wish to do only eight or nine rounds for the pink as it's shorter - try it on and see what you think.) Fingers done! Section 5: Thumb Retrieve the stitches from the spare yarn and split with 9 on one dpn and 8 on another. You can remove the marker. Starting from the corner by the palm of your hand, closest to the index finger, knit 17, then in the gap pick up five stitches. On the next round, k17, k2tog, k1, ssk. Then knit a further six rows plain, or however many you want (you can try it on pretty easily at this point) and cast off loosely. Sew in all ends and enjoy! When sewing in ends, make sure not to accidentally tighten the fingers too much. ©Alyssa Heath. Visit Alyssa's blog Knitting Glasses See Abbreviations and the Glossary for help. |