
Hundreds Of Free Knitting Patterns And So Much More |
Barbara Breiter's Knitting On The Net |
|
Learn To Knit
|
Knitting Pattern For Short Row SlippersBeth Stambaugh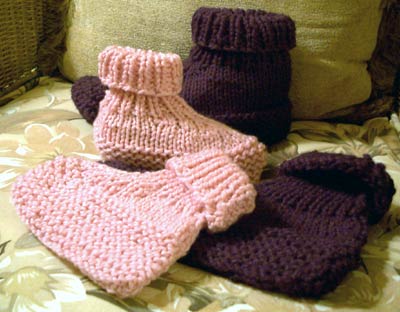 22 sts=4" with two strands held together Resulting fabric is dense. Materials Two 2 ounce skeins of bulky weight yarn Size 9 US (5.5 mm) needles Size Generic directions are for Women's Shoe Size (US) 6 (7-8-9-10-11) Stand on a yardstick to find the length of your foot in inches. Measure both feet and knit for the larger size. A Woman's size 7 1/2 = 9 inches in length on average. 9 inches x 5.50 sts per inch = 49.5 (50 Sts CO).  Instructions for Size 7 1/2 woman's are below; increase for other sizes accordingly. CO 50 sts. P every row in garter stitch for 2 inches (approx 12 rows). End with WS facing you (your choice as to which side will be the WS). Introduce second color (if desired) and P across row. K next row, then P next row. With RS facing, begin first set of decreasing row as follows: Dec Row Part 1: K18, k2tog 3 times, place marker to designate middle of slipper, k2tog 3 times, K1, turn (turn work around so you are now on the WS or purl side of the slipper). Dec Row Part 2: P8, turn (turn work around again to RS or knit side of work). Dec Row Part 3: K8 (you will see a gap), pick up the base of the right needle's last K st and add it to the left needle, now knit the st to the left of this new st with the newly placed st together (this decreases the st you just added, but also fills in the hole that would have been created by the gap). K across remaining sts. This is the same as Make One (M1) except you are using the wrap at the base of the last K st on the right needle and not picking up a st between the left and right needle. Sounds complicated, but just give it a try. It's not necessary and if you want to skip this step you can. You will have a slight hole on the left side of the slipper for each dec row however. Next Row: Purl Repeat the 3 part Dec Row and purl row 3 times more, knitting across to 6 sts before marker, changing colors as desired. On last Dec Row, inc 1 st at the beginning and end as follows to allow for a larger cuff: Last Dec Row: K1, inc 1 (k in front and back of next st) to avoid a gap, do the Dec Row as above by knitting to within 6 sts of marker and k2tog 3 times, slip marker, k2tog 3 times, k1, turn. When you have finished all 3 parts of the last Dec Row, then p1, inc 1 (P in front and back of next st), p across remaining sts (26 sts). Begin Ribbing: K1, p1 loosely across for 12 Rows. Bind off loosely. Sew up cuff, heel, and foot. If you want you can spray the bottom of the slippers with any nonskid spray that is washable for better traction. Instructions (in the round) For this example, I knitted with a single strand of Lion Brand Wool-Ease Thick & Quick (Charcoal) for the soles, then used one strand each of Lion Brand Vanna's Choice Medium Weight yarn (Navy and Linen). CO required number of sts (10 inch foot x 5.5 sts per inch = 55 sts (Round to 56). Mark the beginning of each rnd with a different color marker than the one you will place for the middle of the toe. Knit every Round for 2 inches (approximately 12-14 rnds) with the yarn you are using for the sole of your slippers. Switch to two strands of yarn you are using for the body of the slippers. K 4 Rnds placing a marker (PM) for the center of the toe between sts 28 and 29 as you are knitting your first round. Begin first of 4 Decrease Patterns (shaping the toe): K 22 sts, then K2tog 3 times, slip marker, K2tog 3 times, K1, turn to work on the WS of the slipper. On the WS, P8 sts, then turn to RS. On the RS, K4, slip marker, K to gap, then pick up the collar of the st you just knit and place it on the left needle, K this st together with the next K st (filling in the gap), K to beginning of rnd. K to the gap that appears before the marker and then pick up the collar of the last st before the gap and place it on the left needle, K this st together with the next K st and K to end of Rnd. 2nd Dec Rnd: K to within 6 sts of the toe marker and K2tog 3 times, slip marker, K2tog 3 times, K1, Turn, P8 sts, Turn, K to gap, pick up collar of last K st and K tog with the next st, K to within 2 sts of the end of the rnd and Kfb to increase 1 st, K1, Kfb of next st to increase 1 st, K to gap, pick up collar of last K st and K tog with the next st, K to end of Rnd. 3rd Dec Rnd (do not increase in this Rnd) 4th Dec Rnd Same as 2nd Dec Rnd. Note: In the 2nd and 4th Rnds, you will be regaining 4 sts by knitting in the front and back of 2 sts during these decrease rnds to allow enough sts for a comfortable cuff. That gave me 54-24=30 + 4 = 34. Since I need 38 sts for a good fitting cuff, I will increase 2 more sts every other rnd in the following 4 Rnds on Rnds 2 and 4 to avoid increasing on subsequent rounds. You want at least one even K rnd between your increases.* K 4 rnds with NO decrease. *If you need to add more sts for your cuff then increase on the 1st and 3rd rnds only the number of sts you require. I needed 38 sts, and regained 34 above, so I increased 2 sts on Rnds 2 and 4. Beg K1, P1 rib for 4-5 inches. BO with larger needle or BO loosely. The open bottom of your sock can be sewn closed using a tapestry needle and yarn or pick up the same amount of sts around the bottom as you originally cast on and either Kitchener the bottom together or do a three-needle bind off. For those who are familiar with a provisional cast on, you can just remove the provisional cast on and knit the live sts with the Kitchener st or three-needle bind off. Note: Kitchener should be done with RS facing; however, three-needle bind off would be best done with WS facing as the seam adds to the garter stitch design. See Abbreviations and the Glossary for help. |