
Hundreds Of Free Knitting Patterns And So Much More |
Barbara Breiter's Knitting On The Net |
|
Learn To Knit
|
Toe Up Anklet Socks Knitting PatternDesigned by Rachel Calado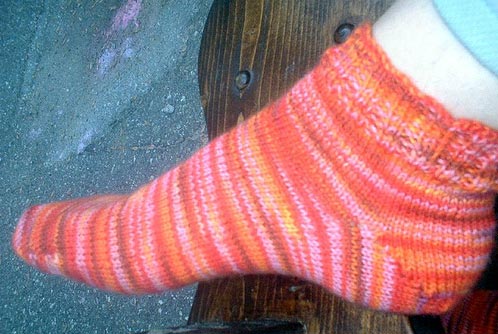 Anklet socks with a pretty edging are knit from the toe up and fit most women.
Materials:
Anklet socks with a pretty edging are knit from the toe up and fit most women.
Materials:100 grams sock weight yarn Size 1 US (2.25 mm) circular needles or size needed to obtain gauge; 40" is best but can be knit with 32" Crochet hook Waste yarn for provisional cast on Gauge: 32 sts = 4 inches Instructions: Cast On With contrasting (waste) yarn, crochet a chain of approx 36 sts. Pick up 32 sts with working yarn through back bumps of chain. Purl 1 row. Begin Short Rows Row 1: k31, yarn fwd (yf), sl 1, yarn back (yb), slip stitch back to left needle. Turn. (You will now have 1 wrapped stitch on right needle, and 31 sts on left needle.) Row 2: Purl to last st, yb, sl 1, yf, slip stitch back to left needle. (You will now have 1 wrapped stitch on right needle, and 31 sts on left needle.) Row 3: Knit to last stitch before wrapped stitch. (You can generally tell which stitch this is, because those two will be rather close together compared to other stitches.) yf, sl 1, yb, slip stitch back to left needle. Turn. Row 4: Purl across to the last stitch before the wrapped stitch. Wrap and turn. Repeat Rows 3 and 4 until you have only 16 "live" or unwrapped stitches left. You will have wrapped 8 sts on either side of these stitches, and will be ready to begin with a knit row. **How many stitches you leave unworked in the middle depends on how wide you want your sock toe to be. If you want it a bit wider, do a couple fewer short rows. If you want it a bit narrower, do a couple more short rows. Now you'll work the second half of the toe: Row 1: Knit across the 16 live stitches across to the first unworked, wrapped stitch. To work this stitch, pick up the wrap and knit it together with the stitch. Wrap the next stitch (so that it now has two wraps) and turn. Row 2: Purl across to the first unworked, wrapped stitch. Pick up the wrap and purl it together with the stitch. Wrap the next stitch and turn. On subsequent rows you will pick up both wraps and knit or purl them together with the stitch. Continue until you have worked all the stitches and you once again have 32 "live" stitches. See how this made a nice pocket for your toes? You are now ready to pick up your provisional cast on stitches with the other end of your circular needle. Place the 32 stitches you've been working on, on one end of the circular, on the needle portion. Hold the toe of the sock, toe pointing down, with this needle in the back pointing left. Now, take the other needle end of the circ, and start picking up stitches from right to left. Both needles will end up parallel to each other, pointing to the left. Unzip your provisional cast-on just a stitch or two at a time, and place them on the other end of your needle. Although you initially cast on 32 sts, you will see that you only have 31 sts on the needle. This is correct! Pick up one more stitch between the needles. You now have a total of 64 stitches and are ready to work in the round, a la magic loop method! Now hold the sock so that both needles are pointing to the right, the toe pointing down. Grasp the tip of the back needle (which also has your working yarn hanging from the first stitch) and gently slide it out, leaving the stitches on the cord of the circular. Don't pull it all the way. Leave a loop of cable between the front half and the back half of the sock. Pull far enough that you can now use the tip of the needle to start knitting the stitches off the front needle. Knit across the row, turn your sock, and now pull the loop to position the needles that were on the cord onto the needle again. Repeat. Continue in this manner, working in stockinette stitch, until the sock is approximately 1½ to 2 inches shorter than your foot. You can slide all stitches onto the cord of the needle, being careful to leave a loop of cord between the two halves, to try on the sock at any time. Time to do the heel! Short Row Heel (worked on one needle only) Row 1: k31, yarn fwd (yf), sl 1, yarn back (yb), slip stitch back to left needle. Turn. (You will now have 1 wrapped stitch on right needle, and 31 sts on left needle.) Row 2: Purl to last st, yb, sl 1, yf, slip stitch back to left needle. (You will now have 1 wrapped stitch on right needle, and 31 sts on left needle.) Row 3: Knit to last stitch before wrapped stitch. (You can generally tell which stitch this is, because those two will be rather close together compared to other stitches.) yf, sl 1, yb, slip stitch back to left needle. Turn. Row 4: Purl across to the last stitch before the wrapped stitch. Wrap and turn. Repeat Rows 3 and 4 until 8 of the heel stitches are wrapped and on left side, 16 stitches are "live" in the middle, and 8 are wrapped on the right. At this stage, you should be ready to work a right side row. Your heel is half done. **How many stitches you leave unwrapped in the middle depends on how wide you want your sock heel to be. If you want it a bit wider, do a couple fewer short rows. If you want it a bit narrower, do a couple more short rows. Now you'll work the second half of the heel. This is the same way you worked the toe. Row 1: Knit across the 16 live stitches across to the first unworked, wrapped stitch. To work this stitch, pick up the wrap and knit it together with the stitch. Wrap the next stitch (so that it now has two wraps) and turn. Row 2: Purl across to the first unworked, wrapped stitch. Pick up the wrap and purl it together with the stitch. Wrap the next stitch and turn. On subsequent rows you will pick up both wraps and knit or purl them together with the stitch. Continue until you have worked all the stitches and you once again have 32 "live" stitches. See how this made a nice pocket for your heel? When you have all stitches live again, you'll be ready to begin working in the round again. It's easier this time - no provisional cast on to pick up! On your first round, pick up an extra stitch between the front and back needle, at each end, to close any potential hole. 66 sts. Work in St st for approx 12 rows. Now do one inch of k2, p2 ribbing. Binding Off For this I like to use a "sewn" bind off. It provides a nice stretchy edge for your sock. Break yarn, leaving it at least 4 times as long as the circumference of the sock. Thread the yarn onto a tapestry needle. Insert the needle through the first two stitches, as if to purl (from right to left). Pull yarn through leaving the stitches on the left needle. Now insert the tapestry needle through the first stitch as if to knit, and slip it off the needle. Continue in this manner until all stitches are done. Weave in ends, and wear! ©Rachel Calado. Please share, but do not publish or profit from the use or distribution. Visit Rachel's blog knittyknotty at http://knittyknottyblog.blogspot.com See Abbreviations and the Glossary for help. |